Friday, December 31, 2010

Happy New Year!!!

Happy New Year Everyone.  I hope 2011 is a great one for everyone.  I have made a Happy New Year’s card.  I usually don’t make New Year’s cards, but something about these stamps just screamed New Years to me.  new years card [1600x1200] I used several different supplies for this card.  For the card base, I used the new grand nestabilities labels 1.  I cut my cardstock to 6 x 12 and folded it in half.  Then I placed the nestie so that just a little bit of it was above the fold.  misc and xmas_0003 [1600x1200] This way your fold will stay intact when you run it through the machine.  I used my new Grand Calibur machine.  This thing cuts great and it’s convenient to be able to cut more than one shape at a time.  misc and xmas_0004 [1600x1200] Here is a picture of the Grand Calibur (ignore the mess on my desk).  The stamps on this card are all from Stamping Scrapping Designs.  new years card [1600x1200] The design stamped on white around the oval is from the Beaded Ovals set.    I then stamped the sentiment Happy New Year which is from the Celebrations Set.  The martini glasses in the brad are also from the Celebrations set.  I colored them with a copic spica marker and then put them into a brad with my chatterbox brad maker.  The final stamp set used on this project is the stitching along the labels 9 die which is from the Dash it All set.  I finished the card off with some rhinestone bling and a glittery flower.  So, Happy New Year everyone!!  

Tuesday, December 14, 2010

BRRRRR

Magnolia Stamp Lovers is having an ornament challenge. I decided to do something a little bit different with my ornament project- I made an ornament shaped card.

I cut the card on my cricut Imagine. The card base is from Joys of the Season and I filled it with patterns from the Mr. Frosty cartridge. The colors look so vibrant and I love printing them on textured cardstock. I then colored my Tilda to match the papers. This Tilda is called Chilly Tilda, she is an oldy, but a goody!!! I think she looks so cold. I stamped the sentiment (from the Stamping Scrapping Designs Celebrate set) onto mynestabilities label 4 and then sprayed it with my copic air compressor while it was still in the nestie. I love how this leaves such a nice clean white border around the shape.


Monday, December 6, 2010

HO HO HO

It is time for a new challenge at House Mouse and friends. This time of year, everyone is busy so they have decided to make this one an anything goes challenge. You can create any type of House Mouse and Friends project you would like to.
I have decided to make mine a Christmas card.

I used the stamp St. Nick Mouse. I have colored the image with copic markers. I paper pieced the gifts to make them look more like they had been gift wrapped. I added a little bit of 3 dimensional snow to the bottom with my snow writer. I kept the emebellishments simple just adding a couple of flat snowflakes. This card could actually be mailed with no extra postage required!!! The sentiment is from Stamping Scrapping's Celebrate set. Now, this is the year I am actually going to mail Christmas cards!!!! I still have all the ones I made last year and they need to go out!!!


Monday, November 29, 2010

MSL Punch Challenge

Magnolia Stamp Lovers is having a challenge to use your punches. Oh, I remember when I bought my cricut and I thought I would never need to use punches again. Sad to say, that's not true. LOL I have used this adorable stamp from Magnolia's collection last Christmas called Santa's Little Helper. I think this stamp is so cute! If you don't have one hurry and grab one, Cindy only has 2 left!!!

I have used 2 different Martha Stewart punches on this project. On the side I used the holly leaf border punch and for the strip Tilda is sitting on, I used the snowflake set. The paper I used is Basic Grey Eskimo Kisses. I put a poinsettia up in the corner and added a sentiment. Yay!!!! 2 Christmas cards done so far this year!!! Better get a move on to get them all finished. I have used the sketch from Friday Sketchers for the layout of this card.


Wednesday, November 24, 2010

It's Almost Black Friday!!!!!

If you have decided you would like to get a head start on your Black Friday shopping, you need to stop by StampingScrapping. Cindy is marking down tons of stuff!!!! There will be .99 items, TONS OF 40-70% off items, the whole store is ON SALE at least 10% off (except minimum pricing policy items).
FREE GIFTS WITH ALL PURCHASES OVER 75.00 (these items retail for $19.99) There will be TONS OF FREE MERCHANDISE given away! The more you spend the MORE value they will add into your box! Cindy will be drawing from ALL orders UNDER $75.00 and 4 PEOPLE will WIN THEIR ORDER FOR FREE! When your name is drawn you will be given a couponcode for your entire order total good for 1 full year!
SALE WILL START FOR SURE AT NOON EST ON THANKSGIVING(TOMORROW) Look for the Black Friday category on the top!!!!!

Monday, November 22, 2010

Cricut Imagine Blog Hop

I recently purchased a cricut Imagine and I love it!!! You can make some great projects in a very little amount of time. When I was given the chance to join in this Imagine blog hop, I jumped at the chance. You should have ended up here from Tisha's blog. If you didn't don't worry, the hope goes in a circle so you will still see everyone's fabulouse creations.

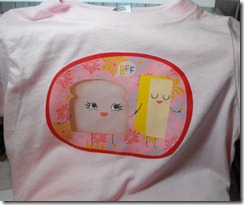
I decided to make some Best Friends t-shirts for my daughter and her BFF. I used this adorable bread and butter image from the Better Together cartridge. I flipped the image and printed it on iron transfer paper. I then laid it on t shirt and ironed it on medium setting for about 3 or 4 minutes. Then I peeled the backing paper off and my t-shirt was complete. tshirt 1 I wish I could say it worked perfectly on my first try, but it did take more than once to get it right. My advice is to make sure you have it positioned where you want it and do not put the iron directly on the image to do touch ups. That does not work. Now, if you want to give your BFF a t-shirt, you need a cute bag to put it in. I decorated the gift bag with the same image.tshirt 2 This time I split the image up into layers and pop dotted the bread and butter from the background. I used the Plantin Schoolbook cartridge for the borders and filled them in with a pattern from Better Together so they would match the toast image. Here is a picture of the finished project. tshirt 3 I have really had a lot of fun with this new machine and I can’t wait to create more with it. Now, hop on over to Sarah’s blog and see what she has to share with you.
Saturday, November 6, 2010

A Sketchy House Mouse Card

The House Mouse and Friends Blog is having a sketch challenge- here is a picture of the sketch

and here is a picture of the card I made using the sketch.

I have used the stamp Bobbing on Apples. The stamp is colored with copic markers and cut out and matted with a plain oval and a beaded oval nestabilitie. This stamp was not an easy one for me to color. I'm not great at coloring things that appear in nature. I was using the R39, R37, and R35 copics for the apple and it looked too pink almost like a strawberry. Then when I added the green and the yellow to the top of the apple, there really wasn't a smooth transition between the colors. I ended up coloring over the entire apple a few times with the Y19 marker I used for the yellow. This helped to blend the colors a little more and change the red of the apple so it wasn't quite as pinky. I love the vintage look of the beaded oval and I thought it would go great with this distressed paper from Cosmo Cricket and some lace. I love adding lace to my cards. The sentiment Just Because is from the label accents set and the little outline around it is from the
stamping scrapping designs set made to coordinate with the beaded oval nestabilities. These stamps are made to fit just inside the embossing of the nestabilities.