Showing posts with label cricut imagine. Show all posts

Tuesday, June 18, 2013

Get Carried Away with Animal Antics

I have gotten carried away with Disney projects the last few months and it was nice to sit down and make a card again.  I decided to play some more with my cricut since I had a couple of cartridges I hadn’t opened yet.   I used my Imagine to make this card so that all I needed was a couple pieces of white cardstock. 
photo (28)
I layered different patterns of paper from the Spring Chic Imagine cartridge on my cardfront and then used some 3D foam pads to pop my rhino (from the Animal Antics cartridge) up from the background.  I love his chevron print glasses. 
I printed some more cardstock for the inside of the card and added my sentiment which is also from Animal Antics.
photo (29) 
That’s it a super quick and easy card.  Don’t get too carried away that you forget to do what you enjoy.
Supplies Used
cardstock
ATG tape
Cricut Imagine

Thursday, February 16, 2012

Happy Birthday!

We have so many February birthdays in my family, it seems that's the only kind of card I can even think of during this time. For this card I broke out my trusty Cricut Imagine . This is my go to machine when I need something done quickly. The octopus is from Birthday Bash, but I filled it with colors and patterns from my Imagine Hey Diddle Diddle cartridge.
I thought this little octopus was perfect for a peachy keen face stamp, so I added one and I think she looks so sweet. Cutters Creek sells a couple of different face stamp assortments from Peachy Keen and they're perfect for adding just the right facial expression to your die cuts. To finish my octopus off and give her some style, I added some faux stitching with one of my copic spica pens. I wish you could see the shimmer more in the picture it's just the right amount of bling. I also went over her face to give that a little more shine too. No self respecting octopus would head off to a birthday party without the perfect accessory and I though she would look adorable with a flower on her head. This little lily from Cutters Creek's own brand of flowers was just the perfect touch. The final element for my octopus was to attach her to the card with an action wobble so she can move like a real octopus. I finished the card off with some more faux stitching and a sentiment and it's ready to be sent off!

Wednesday, February 1, 2012

Cooking With Cricut Valentine's Challenge

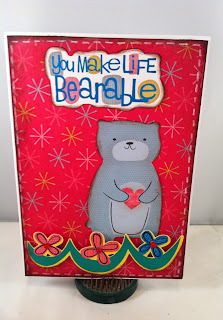
It's time for another Cooking With Cricut challenge. Today's challenge is to create a valentine's card for a child using red, pink, and white. I used my Imagine cartridge Better Together to make the cute little bear card. I love how this cartridge has a sentiment to go with every image. I filled a 5x7 rectangle with the red pattern for the background. I then cut the bear at 4 inches. I added the bear and the sentiment to the card. I used pop dots to get the grass and flowers to stand out a little from the bear so the card wouldn't be so flat. To finish it off, I added some white faux stitching all the way around and put some red rhinestones in the centers of the flowers. If you would like to see all the cute projects the other designers came up with, please visit www.cookingwithcricut.com and maybe even enter you own card!


Wednesday, January 4, 2012

Something New- Cooking With Cricut

Today's Cooking With Cricut challenge is to use something new. I used my newest cartridge on my baby project for yesterday, so I looked for my next newest cartridge and found Kate's Kitchen. This cartridge is full of some adorable cooking themed images and the paper patterns are great! I flipped through the book and thought this little egg plate was cute and I knew I had the perfect sentiment stamp to go along with it.


I cut the egg plate and inked around the edges. Then I cut 2 5x7 rectangles and filled them with different patterns. I inked around the edges of the papers and added them to the card. I covered the seam with some turquoise lace. I cut a square with another pattern and cut a photo corner out of it and then printed a red rectangle to stamp my sentiment "egg-specially for you". I hope you have a chance to stop by and join in our challenge at www.cookingwithcricut.com


Monday, January 2, 2012

Welcome Baby

I hope everyone had a great holiday season and you're ready for a great new year! Today, it's time for another Papercrafting World challenge. The theme this time is Welcome Baby. Melin has created some adorable files for this challenge. She is having some problems with the shopping cart part of the site, so if you don't see the one I used listed (baby set 1) keep checking back.

I made a scrapbook page using the Baby Set 1 file. This file comes with the baby bear holding a bottle, the baby banner, and a really cute butterfly I didn't use on this page. I wanted to try something a little different with this page and use my cricut Imagine with it. You can't use the 3rd party softwares with the Imagine, but you can get them to play nicely together. I combined a couple of elements from the Imagine cartridge Hey Diddle Diddle that I think go perfectly with this theme like the rug, the stacking toy, and the ball.

I printed a square of the brown color that comes on the cartridge to use for my bear. I also printed a square of a couple of different patterns to use for her shirt and her bib. I wanted to make sure my background matched perfectly, so I printed a entire sheet of this pink color and another sheet of the little flower pattern I used for the border. I love how cute this little bear is and it was really easy to put together.


The other element from the Baby Set 1 file I used is the banner. Banners are everywhere now it seems and this one is really cute. It has two layers a background scalloped layer and the top straight layer. I added some faux stitching around the top layer and some white dots to my letters to make them stand out a little more.


I hope you can find some time to stop by and play along with our challenge. You can see the rest of the design team's work and enter your own creation at www.cookingwithcricut.com


Friday, December 23, 2011

25 Days of Christmas Day 22

Hello and welcome to Day 22 of the 2nd Annual 25 Days of Christmas celebration. There are stil some great prizes to win and some free files to grab, so head on over to Cooking With Cricut to check it out.

Day 22 is a Holiday theme, so I decided to create a Nutcracker gift bag. My niece is a ballerina and every year her studio does a performance of the nutcracker. I thought this would be the perfect bag to use for her gift this year.

The nutcracker and the background paper are from the Santa's Village Imagine cartridge. This cartridge is full of great stuff!

I did things a little differently this time and cut all the layers of the nutcracker and pop dotted them to give him some more dimension. This is a picture of the side view so you can see all the layers and dimension. I love that you can do things either way with the Imagine.


To make the bag a little fancier, I added some stickles to the nutcracker and added a bow and poinsettia to the handle. It's hard to see in this picture, but it's there. I am having some major lighting issues in my scrapbook room and I need to find a new place to take pictures.


I hope you have been enjoying our 25 Days celebration and don't forget to check back for the final 3 days!!! I would also like to wish everyone a very Merry Christmas and a Happy New Year!!


Wednesday, December 14, 2011

Gift Tags

It's time for another Cooking With Cricut Challenge!!! This time our challenge is to create gifts, gift tags, or cards. I thought this would be a great time to use the Imagine so I could make a lot of tags in a short amount of time. Christmas Wish has a page full of tags and they are all cute. I cut the page at 10.6 inches and this is what I got.
All of the tags in the photo were on one sheet of cardstock. I even messed up 2 of them so there were more than this. The only thing not on the same sheet is the little box.

Here is a close up of the little box. It's perfect to fill with Christmas candy or treats.


Here are a few more of the tags. All I had to do is add some ribbon and some stickles.

This pink tag with the ornaments was a little big, but I thought it was perfect for a mini Christmas card.


I loved the patterns and the colors of this cartridge and it was really quick to make some great tags!

Tuesday, December 13, 2011

Deck the Halls

It's time for another Paper Crafting World Challenge! This time our theme is Deck the Halls and we were challenged to create an ornament. I saw a great post on one of the cricut blogs about using a mini pillow box as a little shadow box ornament and thought I would give it a try. I cut the pillow box from wrap it up at 7.5 inches and flood filled it with a fun pattern from Christmas Wish on my Imagine. I then cut an opening out of the front with a nestability. I colored these adorable little kitties in winter attire digital stamp with my copic markers. These little guys are just too cute!! I put the kitties on the back of the pillow box with some pop dots. I then added a poinsettia and a handle so I could hang it on the tree. If I had more time I would have made the inside of the box a different pattern so you could see the dimension more, but my Imagine mat was sticky and kept cutting my blue rectangle in half so this was the best solution I could come up with.

We would love for you to play along with us at www.cookingwithcricut.com and don't forget to check out our 25 days of Christmas celebration with new posts every day in December!


Sunday, November 13, 2011

Honeypop Cards

Honeypop paper is one of my favorite new products. I love pop up cards and this stuff makes some great ones. Honeypop paper is honeycomb tissue paper. There are stamps that are made to coordinate with the honeypop paper and they are adorable. For my first card I chose the stamp set Cupcake Birdy. bird outside [1280x768]


The paper for this card is from the Echo Park. I stamped the little bird with the cherry in its mouth and colored it with my copic markers. The Happy Birthday sentiment is also from the Cupcake Birdy set. Here is a picture of the inside of the card.


bird inside [1280x768]


When you open the card, the cupcake spreads out. The stamp set also comes with a stamp of half a cupcake to stamp on the honeypop paper. The paper has a black arrow on it to show you which direction to stamp your image. cucake birdy You need to make sure the arrows on your stamp are going the same direction as the arrow on the paper. You also need to leave a 1/8 of an inch channel for the honeypop paper to fit into. Since I made a 4 1/4 by 5 1/2 card, I scored mine at the 1/8 of inch mark just to the left and right of the 4 1/4 mark. So find you center point and then score 1/8 on either side of that. The directions said to score at 4 3/16 and 4 5/16 but my scoring boards don't do 16ths so this is the solution I came up with.


I love this technique so much, I wanted to try a Christmas card with it. For the background paper on this card I printed one of the paper patterns from the Santa’s Village imagine cartridge on some kraft cardstock. This gives it a vintage feel which is perfect for the images on this cartridge. I added a poinsettia and an image of Santa checking his list.


santa outsidde [1280x768]


I had a pack of green honeypop paper and thought I would try to make my own Christmas tree. I drew half a Christmas tree on the paper and cut it out. It worked!


santa inside [1280x768]


I had so much fun with these projects. The best tip I have for using the honeypop paper is to have some good scissors. The paper is pretty thick.


Cutters Creek Shopping List


Honeypop clear stamps


Honeypop paper


Echo Park Paper


cricut Imagine

Friday, October 21, 2011

Adopt a Shelter Pet Blog Hop

Welcome to Scrappy and Piggy and the CookingWithCricut.com “Adopt A Shelter Pet” Hop! October is National Adopt a Shelter Dog Month, but we wanted to honor and celebrate all of our furry friends! If you've come from visiting Melin at the Cooking With Cricut blog, you're in the right place! If you've just happened across my blog and would like to hop along with us, you can go to CookingWithCricut.com and start at the beginning.

We recently adopted a new puppy. She is a little mutt, but we love her. I have used my cricut to make this layout and display some of her adorable baby pictures.

snooki layout [1280x768]

For this project I used two different cricut cartridges. For the little Snooki dog I used Paper Pups. I have to say this little dog looks a lot like her. For the rest of the layout, I used the Cricut Imagine cartridge Baby Boutique. This cartridge has some great elements. I printed and cut the frame with the crown and the title. The background paper which is kind of hard to see in the picture was also printed on the Imagine as well as the giraffe print border on the bottom. I added some bling to the crown and the title because you can never have enough bling!

I do have a small blog candy package to give away to one person who leaves a comment on this post.


Now it's your turn! Link up your purr-fectly wonderful pet-themed project at CookingWithCricut.com. Here are a few guidelines:

Must follow the challenge topic.
Must be a NEW project for this challenge. No back dated posts please.
Must have a link back to this post on your blog.
Must link your project post through Inlinkz and not just your blog.
Must use your Cricut in some capacity.
Must HAVE FUN!
You may gladly combine challenges . . . we love to pile it on TOO!


The Design Team will pick their three favorites and one lucky person will be chosen randomly to win one of the prize packages being offered in this hop. There is also a prize package for just leaving us some love (a comment) on the CWC blog. One catch, those leaving comments MUST be a CWC follower. Each prize winner will receive a $20 gift voucher-download from PaperCraftingWorld.com. The Design Team’s top three will each receive $5.00 gift voucher-download from PaperCraftingWorld.com.


Now head on over Adrian’s blog at byadrain4u to see what they’ve cooked up for you!


“Adopt A Pet” Blog Hop Participants:
Melin-CWC http://www.CookingWithCricut.com
Mindy - http://scrappyandpiggy.blogspot.com
Adrian - http://www.byadrian4u.blogspot.com
Charlotte - http://alittlebitofdetail.blogspot.com
Madison - http://funkycards.blogspot.com
Nita - http://www.niftynitanotes.blogspot.com
Jill - http://www.jaihartjustlovelydesigns.blogspot.com
Holly - http://ribbonsandglue.blogspot.com
Maria Elena - http://mariaelenaworld.blogspot.com
Linda - http://www.lindascreativity.blogspot.com
Heather http://www.heather-p.blogspot.com
Felicia - http://scrapperinthemaking.blogspot.com
Court - http://courtscraftcorner.blogspot.com
Elizabeth - http://ejoym.blogspot.com
Debbie - http://workinscrappinmomof4.blogspot.com
Dalis - http://stampergirl.com
Jen - http://gator-4-life.blogspot.com

Wednesday, July 20, 2011

Celebrate!!!!!

When I saw the cricut lite cartridge Crocs Rule, I knew I had to have it! I love gators and the ones on this cartridge are just too cute!!

I used my cricut Imagine to print the paper patterns I used on this card. I love the bright colors on this cartridge. I inked around the edges of my die cuts and added some faux stitching around the ship. I wasn't sure what to do about adding a sentiment for this card. There didn't seem to be room for it anywhere, but cards need a sentiment. I found this little celebrate sentiment and stamped it directly on the ship in some brown ink. This cute little card will serve as my entry in the Pink Stamper's Design Team Call. Robyn challenged the contestants to make a card using green, orange, turquoise, and brown. Wish me luck! Robyn has some adorable sentiment stamps that are perfect for cricut projects.

Monday, July 11, 2011

A Precious Baby Girl Card

I wanted to make a precious little baby girl card to show you how I like to use my Irock. Here are a picture of the Imaginesce supplies I used on this card.

baby card 001 [1280x768]

In this picture you can see my Irock tool, a compact full of rhinestones, a couple of lip gloss like containers full of gems, and my little tray which lets me keep track of all my gems. In the tray you will see one of the applicators that comes in the lip gloss tubes. When you wet the end of the applicator, it can be used to pick up the gems and place them where you want them to go. This is a lot easier than trying to pick them up, especially if you have long nails.

Here is a picture of the card I made using the Irock gems and my Teresa Collins Baby Boutique Imagine cartridge.

baby card 004 [1280x768]

I like to look for obvious places in the die cuts themselves or the pattern that look like a rhinestone would fit. In this case, the middle of the wheels was perfect for a rhinestone, as well as the point of the sentiment, and I also mixed a few into the polka dot pattern on the stroller randomly. To finish the card off, I added a couple of Cutters Creek branded gardenias. The flowers come with stamens in the middle of them. I didn’t think it really went with my bling theme, so I carefully cut them out of the flowers and added an Irock rhinestone to the center of each flower.

Using the Irock is extremely simple. First, you need to place your gems where you want them using the applicator I told you about earlier. Then you place you Irock tool on top of the gem. Here is a link to a video showing you how to use the Irock. You can feel the gem move just a little bit when the glue has melted, that’s the best way for me to know it’s done. It will go a little quicker after the tool is completely warmed up. Your first few may take a little longer. If you are looking for an easy way to bling up your projects, then the Irock is the tool for you.

Cutters Creek Shopping List

Irock Tool

Irock gems

Irock tray

Teresa Collins Baby Boutique (available for special order)

Cutters Creek Branded Flowers
Thursday, July 7, 2011

A Christmas in July Snow Day

I would love to have a little bit of cold weather right now. It’s been over 100 degrees so many days that nothing sounds as good as a little bit of Christmas in July. I decided to make a 2 page layout for my Christmas in July project. It was really simple and quick to do with my cricut Imagine. I used the Snow Angel cartridge to print both pages of my background paper. Snow Angel has some of the sweetest looking images on it I have ever seen. I love printing the patterns on textured cardstock, I think it gives a great look.

snow day 1 [1280x768]

snow day 2 [1280x768]

After I printed my background pages, I printed and cut a few elements to add to it. I popdotted the mom figure in the coat, but I glued the snow angel child directly to the paper. I love the dimension of the pop dots, but if you were making a snow angel, you would be flat in the snow, so I applied that one directly to the paper. The title is from Winter Woodland and filled with patterns from Snow Angel. I used the same technique on the companion page. I stuck the dear directly to the paper, but pop dotted the adorable little snowman up, so I could tuck the picture underneath it a little bit. All I needed to make this layout was my cricut Imagine, 2 cartridges, and a few sheets of white cardstock, you can’t get much easier than that!utters

Cutter’s Creek Shopping List

Cricut Imagine Snow Angel

Monday, June 6, 2011

Happy Birthday Matey


It's time for another digital stamp challenge on Papercrafting World. This time our theme is to create a masculine card. This is not my forte. I make a lot of girl cards. I love frilly, but that doesn't work for masculine cards. I chose this cute little pirate bear stamp and colored him with my copic markers.


I would love to say I spent hours coloring the background image with my copics too, but I didn't. I printed the image on my cricut Imagine. It is from the Buccaneer cartridge. The sentiment Happy Birthday Matey is also from Buccaneer. I pop dotted the sentiment and the bear up off the background. Since the background paper had so much detail I decided to leave the card alone and not add any embellishments. I think it's pretty masculine looking. What do you think?

Tuesday, April 26, 2011

Fun With My Cricut Imagine

I LOVE my cricut Imagine. It allows me to make some great looking cards in a realatively short amount of time with one sheet of white paper. These are a couple of cards I have made with my newest Imagine cartridges, All Wrapped Up, Buccaneer, and Lori's Garden.


This first card was made as a challenge for the Cutters Creek Design Team. Kim sent us all a pack of her flowers and we had to make a Mother's Day project with them. I decided to cut this beautifl birdcage image from Lori's Garden and use the micro roses to pop out the flowers on the image. I popdotted the entire image up from the background paper (also from Lori's Garden).


I added some ribbon and bows to one side and some pearls in the corner of the other side. This cartridge was made for pearls. I decided to try something different for the sentiment on this card. I set my Imagine to print only and filled the sentiment Happy Mother's Day from the Calligraphy cartridge and filled it with a pink color. I cut it with a labels 4 nestie and then matted it with a larger nestie cut in the same pink color. Using the Imagine to print sentiments like this is a great way to create some quick and easy sentiments for your cards that match perfectly.


For this next card I used the new cartridge Buccaneer. This cartridge is full of some really cool pirate art work. I couldn't decide which image to cut first, so I let my daughter pick. She picked this scary looking pirate ship and the red striped paper for the background.


I added some black gingham ribbon and voila- a boy card.


Now, it took so much out of me to make a boy card, so I had to go back to something girlie. The new cartridge All Wrapped Up has some great card and box designs. I picked this little Russian doll image and used it to make a birthday card for my niece.


I love all the bright springy colors on this cartridge. I'm making sure I give my Imagine a lot of love this week, because next week it will be expecting a new little sister- the Expression 2!!!!!


Wednesday, April 6, 2011

Fun Cricut Cards

I am determined to stop collecting cricut cartridges and start using them. I sat down and went through all the ones I've bought that haven't been used. The list was embarassingly long, so I started on a mission to use them all. I have found that usng the Imgaine app on my Gypsy make it really easy to put a card together. You can choose the background paper(s) you want and then fill the layers of your image from the same Imagine cartridge. This way you're sure everything is color coordinated. I laid out a lot of the new cartridges and had my daughter pick an image she liked off of them. She picked this little giraffe from the Sugar and Spice lite cartridge. I filled the layers of the giraffe with a pattern and a solid color from the Imagine More Cards cartridge. I popped him up from a scallop circle (also from Sugar and Spice and filled with pink from Imagine More Cards). The background paper for the card is the same polka dot pattern I used on the giraffe, but I printed and entire 12 x 12 piece of it. The cool thing about the Imagine is that it scales the pattern to the size of your cut. On the 12 x 12 sheet of paper the dots are much larger than they are in the smaller giraffe. It's nice to be able to cut smaller elements without losing the pattern. I cut the sentiment from the Simply Charmed cartridge and filled it with a darker shade of pink, then I finished the card off with some ribbon and a bow. For this next card, I used the Sweethearts cartridge to cut the large damask shape. I filled the main shape and the shadow with pattern from the Elise Imagine cartridge. I cut a square from another pattern to use as my background paper. I wanted to add something else, but I couldn't decide on a sentiment. I chose this border from the Martha Stewart Elegant Cakes cartridge and filled it with this sand color from Elise. The Martha Steward Elegant Cakes cartridge has a lot of the same designs you find in the Martha Stewart punch around the page punches, but the cartridge takes up less room than all the punches. I still have a lot more cartridges to get through, but it's really been a lot of fun reconnecting with my cricut.

Thursday, March 31, 2011

A Pretty Card

Everywhere you look you see stuff made with the Lori's Garden cricut cartridge. I was never that interested in (or so I thought). I didn't think I would be able to get it so I tried not to obsess over it like I usually do. Well what do you know, they put it up for sale on cricut.com of all places and at an affordable price, so I looked at the handbook and I fell in love. This cartridge is really pretty. Not only is the artwork beautiful, but so are the paper patterns that go with it. I am determined to use my cartridges as I get them and not just collect them. This is the card I made with my new Lori's Garden cartridge.


I love the colors and the patterns of this cartridge. I chose this grey background with the scipt and cut it using the 5x7 rectangle image that is on the Imagine itself. Then I cut this birdcage image. I love how it looks like a birdcage and a chandelier combined. I popped it up off the yellow patterned top not shape and added some pearls. Then I cut a border from the Martha Stewart Elegant Cakes cartridge and filled it with the salmony pink color on the cartridge. I added some sheer brown ribbon and fed it through the sentiment. I added some pearls to the sentiment as well. This a different look for me becuase my style is usally very cutesy, but I just love the look of this cartridge. I know my pal Sheri would love this one. It's got her name written all over it.

Tuesday, December 14, 2010

BRRRRR

Magnolia Stamp Lovers is having an ornament challenge. I decided to do something a little bit different with my ornament project- I made an ornament shaped card.

I cut the card on my cricut Imagine. The card base is from Joys of the Season and I filled it with patterns from the Mr. Frosty cartridge. The colors look so vibrant and I love printing them on textured cardstock. I then colored my Tilda to match the papers. This Tilda is called Chilly Tilda, she is an oldy, but a goody!!! I think she looks so cold. I stamped the sentiment (from the Stamping Scrapping Designs Celebrate set) onto mynestabilities label 4 and then sprayed it with my copic air compressor while it was still in the nestie. I love how this leaves such a nice clean white border around the shape.


Monday, November 22, 2010

Cricut Imagine Blog Hop

I recently purchased a cricut Imagine and I love it!!! You can make some great projects in a very little amount of time. When I was given the chance to join in this Imagine blog hop, I jumped at the chance. You should have ended up here from Tisha's blog. If you didn't don't worry, the hope goes in a circle so you will still see everyone's fabulouse creations.

I decided to make some Best Friends t-shirts for my daughter and her BFF. I used this adorable bread and butter image from the Better Together cartridge. I flipped the image and printed it on iron transfer paper. I then laid it on t shirt and ironed it on medium setting for about 3 or 4 minutes. Then I peeled the backing paper off and my t-shirt was complete. tshirt 1 I wish I could say it worked perfectly on my first try, but it did take more than once to get it right. My advice is to make sure you have it positioned where you want it and do not put the iron directly on the image to do touch ups. That does not work. Now, if you want to give your BFF a t-shirt, you need a cute bag to put it in. I decorated the gift bag with the same image.tshirt 2 This time I split the image up into layers and pop dotted the bread and butter from the background. I used the Plantin Schoolbook cartridge for the borders and filled them in with a pattern from Better Together so they would match the toast image. Here is a picture of the finished project. tshirt 3 I have really had a lot of fun with this new machine and I can’t wait to create more with it. Now, hop on over to Sarah’s blog and see what she has to share with you.