Tuesday, December 11, 2012

Dress up your die cuts

I have found some really cute graphics lately that you can either use in digital scrapbooking or print them out and use them traditionally.  I decided to print some out and dress them up a little bit.  I printed this little dog image and the sentiment.  I wanted to add something to the image to make it pop a little more.

photo(11)

I thought liquid applique would be perfect for this.  I added to the dog’s puffs.  Liquid applique puffs up when it is heated with a heat gun.  Ideally you should let it dry overnight, but I just gave it an hour or so and then hit it with the heat gun and it worked fine.  I love the three dimensional look. Here is a close up.

photo(12)

  I mounted my image on some Echo Park paper with some ASI clear foam and I have a super quick and simple card done.

 
For this next image,  I decided to try something a little different.

photo(13)

I thought the fur on the Santa suit would look great with some fun flock.  I covered the fur in glue and the dropped the fun flock on to it.  It helps to kind of push the flock into the glue to get it to stick really well.   Then I decided to make his boots and belt look like patent leather.  I added some crystal laquer to make them look shiny.  To finish off the belt buckle, I added some stickles.  This little cow image is so whimsical I decided it would be perfect to attach with an action wobble to give it some movement. 
The next time you see some cute graphics, print them out and dress them up a little bit. 


Cutters Creek supplies
fun flock
liquid applique
stickles
echo park
Cutters Creek branded flowers
action wobble

Sunday, September 23, 2012

Beware

It’s time for fall and I’ve been trying to round up all my fall/Halloween decorations for the house.   I like the idea of changing out some of the artwork in the house to match the season.  I didn’t have any Halloween art, so I decided to make some.  I’ve had this little shadow box hanging around for a while and it’s perfect for this.  I love the new Halloween paper pack from My Mind’s Eye Mischievous.  The patterns in this pack are great and I wanted to showcase as many different ones as I could.

  photo(9)

Sorry for the glare in the picture it’s from the glass in the shadow box.  I layered different patterns to fill the back of the shadow box.  Then I went through my cricut cartridges to find some good die cuts.  I cut the cat and beware from the Chic and Scary cartridge and the witch’s shoe is from Happy Hauntings.  I popped the cat and the shoe up from the background to give the box more dimension.  I used the ASI clear foam.  This stuff is great.  Not only is it clear so you can’t see it, but it’s flexible and you can shape it to fit your die cut.  I also added this little wooden chandelier shape up in the corner that I covered with the Wow black embossing glitter. 

When you need a new piece of home décor, don’t forget about your scrapbook supplies.  It’s easy to make just what you need. 


Shopping List

My Mind’s Eye Mischievous Paper Pad

ASI Clear foam on a roll

Wow embossing Glitter

Various Cricut cartridges 

Wednesday, August 29, 2012

GRRRRR

Today is my daughter’s birthday, so I wanted to make her a special card.  She is a real wild child, so I thought this Tiger Tilda image would be perfect. 

grr tilda [1280x768]

The paper I used is from My Mind’s Eye.  This pack is called Miss Caroline All Dolled Up.  I love the chevron pattern in this pack.  It’s my new favorite pattern.  I used some of the other patterns to add some more color.  I love double sided paper packs like this because all the papers coordinate so perfectly together.  I colored Tilda with my copic markers in colors to match the papers  I finished the card off with a sentiment and a Cutters Creek Gardenia. 

I hope my daughter likes her card and that her birthday is as wild as fun as she is. 

Cutters Creek Shopping List

My Minds Eye- Miss Caroline All Dolled Up

Copic Markers

Cutters Creek Gardenias

Monday, August 20, 2012

BOO- Time to Start Thinking About Fall

Halloween is one of those holidays that always sneaks up on me.  It seems like Summer just starts and then the next thing you know, it’s gone and it’s time for Fall.  Kim has added some great new holiday stamps and papers to the store and I couldn’t wait to try some of them out.  For this card I used one of the new La La Land Crafts stamps- Witch Marci.  She’s such a cute little with. 

photo(8)

Marci is colored with Copic markers.  I added a little bit of bling with my copic spica pens to the lace on her dress and the buckle on her hat and her shoes.  The paper I used is my new favorite Halloween pad.  It is called Mischievous and it’s from My Mind’s Eye.  I added some Cutters Creek Brand flowers to one side and my sentiment to the other.  My sentiment is stamped with Wow black embossing glitter.  This stuff is so cool.  I wish the sparkle showed up more in the pictures. 

Don’t let Halloween sneak up on you.  Get some fun new papers and get some projects started. 

Cutters Creek Shopping List

My Mind’s Eye- Mischevious

Wow Embossing Glitter

La La Land Crafts stamps

Cutters Creek Brand Flowers

Sunday, July 29, 2012

Ring Ring

Today I have another card featuring one of the adorable La La Land Craft stamps.  Cutters Creek has just started carrying these stamps and they are so cute.  Right now Kim just has the holiday stamps in the store, but if you want a certain one and you don’t see it in the store, send her an email and see if she can get it for you.  For my card I’ve chosen Telephone Marci. 

photo(7)

I love the retro telephone and her glasses, so I chose papers that with retro colors.   I colored Marci with copic markers to match the colors in the Echo Park Walk in the Park paper pack.  I wanted to add some dimension and texture to the card, so I went over the phone and her glasses with some glossy accents  so they would look like shiny plastic.

marci phone close up

This is a fun way to make certain elements of your image stand out.  I finished the card off with a sentiment (included with the image) and a big flower.  I made a paper covered brad with my I-top to match the papers of the card and added that to the center of the flower. 

One cool thing I did with this card is that I imorted the stamps (Marci and her bench) into my Sihouette Studio.  I resized them and printed them.  I then put the mat in the Silhouette and cut them out.  What a time saver.  I hate cutting around stamps.  This worked like a charm and I know I will do it again. 

Cutters Creek Shopping List

Copic Markers

Echo Park Walk in the Park paper

Ranger Glossy Accents

Saturday, June 23, 2012

Cooking With Cricut June Bog Hop

Welcome to the CookingWithCricut.com and PaperCraftingWorld.com Designers June Blog Hop. Get ready for two days of great projects with each day showcasing different designers and projects. If you have come from Marji’s Blog then you are moving along. If you would like to start from the beginning, please head over to CookingWithCricut.com.

This month our hop theme is all about Birthdays and one special one in mind. Our wonderful DT Coordinator Jen Hudson’s birthday just happened to fall on Saturday so we decided to make birthday inspired projects with a “Jen” theme in mind. Our go to gal is a die-hard Florida Gator Fan. So we decided to use elements on our projects that reflected Our GATOR FOR LIFE Gal’s FANCY;  Florida, The Florida Gators and anything that would make you think of the Sunshine State. Jen is the last on our blog line up so be sure to hop through and leave her some extra special love at the end!

Her is my contribution to the blog hop.  I used the cricut lite cartridge Crocs Rule. 

photo(5)

I used this cute little alligator juggling.  I thought he was pretty festive looking.   I used bright patterns to give it a cheery feel.  After the card was complete, I went a little crazy with crystal laquer.  I used it on the patterns in the juggling balls, the polka dots on the alligator, and on the flowers to give them all a wet look. 

I hope you have enjoyed my contribution to the hop and that Jen has a great birthday!!

 Now on to your next stop Jen.

Don’t forget to leave a comment on the cooking with cricut blog!

Wednesday, June 20, 2012

A Simple Birthday Card

I’ve noticed that when I see cards that other people have made that are really simple and uncluttered, I love them.  However, when I make one myself, I hate it.  I always feel like I need to add more and then I stress over choosing the correct embellishments.  I’m now determined to master the simple look.  For this card all I’ve used is different patterns of paper, a stamped image, and one simple embellishment. 

photo(4)

I wanted the main focus of my card to be the image.  This is one of my favorite Magnolia stamps.  It is called Unwrapped Tilda.  Kim does not currently have this particular stamp in the store, but if you ask nicely, she may be able to order it for you.  I have colored Tilda with my copic markers to match the colors in the Echo Park paper I used.  I love these paper pads.  They make it so easy to pick coordinating patterns.  After I assembled my card, I had to add one embellishment.  I thought this yellow gardenia from Cutters Creek matched the bright and cheery attitude of the card.  I hope I have inspired you to keep it simple sometimes. 

Cutters Creek Shopping List

Magnolia Stamps

Copic Markers

Echo Park Paper

Cutters Creek Flowers

Tuesday, June 12, 2012

Vacation Challenge

It's time for another Papercrafting World Challenge.  The theme this time is vacation and my favorite place to vacation is the beach  For my card  I used one of Melin's adorable digital stamps called Beach Hippo.

 
I used the stamp a little differently this time  I imported into silhouette studio and filled it with colors and patterns.  After I had the colors the way I wanted, I print the image out and then used my cameo to cut it.  I love this technique.  It was really easy and gives the look of the cricut Imagine, which I love.  I then filled some rectangles with the same patterns, printed and cut them, and used them as the paper for my card.

Friday, May 25, 2012

Cooking Witih Cricut Blogaversary Day 5

Hello and welcome to Day 5 of the Cooking With Cricut Blogaversary Celebration!!! Today is all about lace, bows, or ruffles- 3 of my favorite things.  I have used an adorable digi stamp from Papercrafting World for my project.  This stamp is from the QT Patootie collection and is called Franchesca.


I love her little poodle she looks so chic.  I colored Franchesca and her poodle with my copic markers.  I added so ruffly lace to the center of the card and then colored some paper flowers with the copics I used to color the image so they would match.  I found this  rose epoxy sticker and thought it had the perfect vintage feel for this card so I added it to the center of the flower.  I still haven't replaced the bobbin in my sewing machine, so I had to faux stitch on this one.  I used my score bug to pierce the holes and then went over it with a white marker.   If you haven't seen the other designers' projects, please head on over to cooking with cricut and check them out. 

Saturday, May 19, 2012

Congradulations

My niece has 8th grade graduation this weekend, so I thought I would make her a card.  It's been a while since I've played with my cricut Imagine and I thought this would be the perfect time. 

For this project, I used the new Greetings Cards Inside and Out cartridge.  This cartridge is great for making a really quick card.  When I went to print this card, I realized I was out of white cardstock.  Not good, so I had to improvise.  I used a pale sand color instead and I think it turned out better than it would have looked on white. I love it when a mistake works out.  I used diamond stickles to trace over the word grad and make it stand out.  I also printed another layer of the medallion and popped it up off the card with some pop dots.


One great thing about this card is that every design comes with the perfect sentiment to add to the inside of the card.  Remember when you need a card quick, your Imagine can be your best friend.

Cutters Creek Shopping List

Cricut Imagine machine
Stickles
Adhesive

Thursday, April 12, 2012

Love Bunny

Mother's Day is approaching and I thought I would make a sweet little Mother's Day card. I love this House Mouse image called Love Bunny.


I colored the image with my copic markers.After I colored my image, I matted it with one of the fleur de lis square spellbinders. I embossed the square and then ran some ink ove the edges to highlight the embossing. I also inked the edges of all my papers to give it more of a shabby chic look. To finish the project off, I added a Cutter's Creek gardenia to the corner in yellow and grey to match the colors in the Basic Grey paper. I wanted to keep the card simple (not to mention that my scrapbook room looks like a bomb went off in there and I couldn't find a sentiment stamp), so I didn't add a sentiment to the outside.


Saturday, March 17, 2012

Happy St. Patty's Day!

I hope everyone is having a great St. Patrick's Day! My project for today is not a St. Patrick's Day project, but it does have some green in it in honor of the holiday. For this project, I really wanted to focus on the paper. If you're like me, one of the first things that attracted you to paper crafting was all the pretty paper. I used to love to go to a Scrapbook store and load up on different sheets of paper. The problem was when I got home and got ready to use them, none of them matched. I was always scrambling and trying to find a pink close to the shade of pink in the paper I just had to use. Now, I buy packs of paper. I buy the 6 x 6 size to use for card making and the 12 x 12 packs for scrapbooking. I made this little card using several different patterns from one of the Echo Park 6 x 6 pads.

All the color matching and the pattern picking has been done for me. I know all the colors in this pack coordinate perfectly, the only thing I have to do is narrow down which ones I want to use. I especially love how they give you a few solid sheets in the same colors to use as matting like I have done in this card. The only color matching I need to do is to pick copics close to the colors in the papers to color my image. I added a bright yellow Cutters Creek brand flower to the right corner and I was done. It doesn't take long at all to make a card when you don't spend 30-40 minutes trying to find the right shade of cardstock.

Tuesday, March 6, 2012

PCW Salutes Dr. Suess


Today on Papercrafting World, we are celebrating Dr. Suess. Melin has come up with some fabulous Dr. Suess inspired files. I have used this adorable little Thing 1 and Thing 2 digital stamp for my project.


I colored the little things with my copic markers and matted them on some bright blue cardstock. I printed the black and white polka dot paper on my Imagine with the Black and White cartridge. I embossed some red paper with my Cuttlebug and added that as a strip across the middle. The setiment which says Hope Your Birthday is Something Special was printed on my computer.


I hope you have a chance to check out the fabulous designs from the rest of the design team at www.cookingwithcricut.com and then maybe pick up some of the files for yourself.

Tuesday, February 28, 2012

PCW- Purple and Flowers


Today it is time for another Papercrafting World challenge. Today's challenge was to use purple and flowers. This was a tough one for me, I don't use a lot of purple. As I was looking through all the adorable digital stamps on the site I kept getting drawn to this adorable little cat stamp. However, as cute as he is, he didn't have any flowers so I looked some more. Finally, I decided that since I loved the little kitty so much I would find a way to make it work.


I printed the little guy out and colored him with my copic markers. I used my warm greys this time instead of the cool greys. I think it makes him look a little like a Siamese. Since he isn't purple and he doesn't have any flowers on him, I found this Basic Grey paper with purple flowers that was perfect. The sentiment is also from the digital stamp set. You get the cat, and four different sentiments.

Thursday, February 23, 2012

Greetings Inside and Out Cartridge Showcase

Welcome to another Cooking with Cricut cartridge showcase. I have decided to showcase one of the newest Imagine cartridges- Greetings Inside and Out. This cartridge is full of adorable shaped cards for all occassions as well as envelopes, gift bags, and paper patterns.

For my first card, I made this adorable little chicken soup Get Well card.

I cut the card first and then went back and cut another one of the chicken medallions and pop dotted that up off the card. The cool thing about this cartidge is that there is a sentiment to put on the inside of every design. Here is the inside of my get well card.
My next card is a retro inspired Birthday Card in the shape of a cassette tape. Here is the front and back of the card.
The sentiment on the inside looks like one of the extra labels that came with the cassettes so you could label them. I may be showing my age with this one.
My next card is an Elvis Thank You card. I was in Vegas last month, so I loved this card as soon as I saw it. Here is a picture of the front and back of the card.

I added some gold stickles to Elvis' suit to give him some bling. I love the inside of this card. The sentiment is in the shape of the famous Welcom to Las Vegas sign.

For my last card, I wanted to do something a little different. Instead of making another one of the shaped cards, I used one of the extra elements to make a traditional card. I printed a square of the yellow chevron striped paper to use as my background and then cut the little fries and ketchup to add to the front. I love their little faces.

I hope you have enjoyed my Greetings Inside and Out cartridge showcase.


Thursday, February 16, 2012

Happy Birthday!

We have so many February birthdays in my family, it seems that's the only kind of card I can even think of during this time. For this card I broke out my trusty Cricut Imagine . This is my go to machine when I need something done quickly. The octopus is from Birthday Bash, but I filled it with colors and patterns from my Imagine Hey Diddle Diddle cartridge.
I thought this little octopus was perfect for a peachy keen face stamp, so I added one and I think she looks so sweet. Cutters Creek sells a couple of different face stamp assortments from Peachy Keen and they're perfect for adding just the right facial expression to your die cuts. To finish my octopus off and give her some style, I added some faux stitching with one of my copic spica pens. I wish you could see the shimmer more in the picture it's just the right amount of bling. I also went over her face to give that a little more shine too. No self respecting octopus would head off to a birthday party without the perfect accessory and I though she would look adorable with a flower on her head. This little lily from Cutters Creek's own brand of flowers was just the perfect touch. The final element for my octopus was to attach her to the card with an action wobble so she can move like a real octopus. I finished the card off with some more faux stitching and a sentiment and it's ready to be sent off!

Tuesday, February 14, 2012

Happy Cake Day

Ok, I know it's Valentine's Day, but today we are having a brithday challenge over on Cooking With Cricut. February is birthday month in my family, so that totally overshadows Valentine's Day for me. I decided to use this adorable little digital stamp called Bear 'n' Cake Slice to make this birthday card.

I colored this cute little guy with my copic markers and mounted him on some bright cololred squares of patterned paper. It's hard to see in the picture, but I used my silver spica glitter marker on her fork and plate to give it some shine and went over the icing with my pink one to make it shimmer as well. I think this cake looks good enough to eat and I wish I had a big slice of cake right now myself.


Wednesday, February 1, 2012

Cooking With Cricut Valentine's Challenge

It's time for another Cooking With Cricut challenge. Today's challenge is to create a valentine's card for a child using red, pink, and white. I used my Imagine cartridge Better Together to make the cute little bear card. I love how this cartridge has a sentiment to go with every image. 
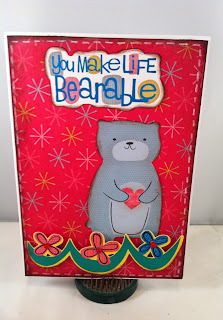
I filled a 5x7 rectangle with the red pattern for the background. I then cut the bear at 4 inches. I added the bear and the sentiment to the card. I used pop dots to get the grass and flowers to stand out a little from the bear so the card wouldn't be so flat. To finish it off, I added some white faux stitching all the way around and put some red rhinestones in the centers of the flowers. If you would like to see all the cute projects the other designers came up with, please visit www.cookingwithcricut.com and maybe even enter you own card!


Tuesday, January 31, 2012

Papercrafting World Challenge!!

The current challenge on Papercrafting World is to create a Valentine's project for a child using the colors red, white, and pink. I decided to use this adorable digi stamp Elephant Love.


I colored the adorable little elephants with my copic markers and then matted them on some red cardstock. I printed the music paper from my Imagine Black and White cartridge. I then added some polka dot ribbon and a sentiment printed from the Imagine Cartridge Better Together. I printed the image a little larger than I usually do by mistake, but I like the way it turned out simple and to the point. If you would like to see what the other deisgners have come up with, hop on over to Cooking With Cricut and check it out!


Wednesday, January 18, 2012

Winter Warmth

This post couldn't have come at a better time. All I was thinking about this morning when I got in my car was keeping warn, it was freezing. The current challenge on Cooking With Cricut is focused on Winter Warmth. I created this page using my Imagine and the Snow Angel cartridge. I printed the full page background papers and then some of then some smaller rectangles to use as mats for my photos. The Snow Day title is from Winter Woodland filled with a pattern from Snow Angel.

I added some extra elements like the sweet little snowman and the mom and popped them up off the page for some added dimension. I hope you have the time to share your winter warmth project with us and don't forget to check out what the rest of the team has come up with at www.cookingwithcricut.com


Tuesday, January 17, 2012

Create a Girly Frame


Papercrafting World Challenge Time!!! This time our challenge was to create a frame using black, white, and one other color with a girly theme. I've been dying to use my Theresa Collins Black and White Imagine cartridge and I knew this was the perfect challenge for it.
I printed this black and white rose pattern on pink cardstock and then placed it on the frame to create a template. I attached the paper to the frame and sanded off the excess. I finished it off with some pom pom trim and some tulle rose ribbon. Then I colored my embellishment with copic markers and attached it in the corner. This adorable digital stamp image is called Stinkin Cute and he is just that. I think he adds a great sense of whimsy to the frame.

Sunday, January 15, 2012

Something Old, Something New Blog Hop

Welcome to Day two of PaperCraftingWorld.com and CookingWithCricut.com’s first Blog Hop of 2012! Our theme is: “Something Old, Something New, Something Borrowed, Something Blue!”

If you have arrived here from Michelle’s blog http://www.michelles-crafty-creations.blogspot.com you’re in the right place! If you’re joining us mid-hop, head on over to see Melin at www.CookingWithCricut.com and start at the beginning so you don’t miss any of the wonderful projects the Designers have created!

Our Designers had to use something old from their craft stash, something new (a recent purchase or new technique), something borrowed (an element from a Cricut cut or from a PaperCraftingWorld.com cutting file or digi stamp) and of course, something blue.

Here is what I came up with . . .

photo (3)

I used my OLD cricut cartridge Nifty Fifties for the title I love the glasses on this cut. I BORROWED the patterns from my Imagine cartridge Bubblegum Stripes and used them to fill the title and for all the papers used in the layout. Another Borrowed element in this layout is the glasses my daughter is wearing. Those were my actual glasses from around 3rd or 4th grade. They’re perfect for nerd day.

Here is a close up of the title.

photo (5)

I think the mixture of colors and patterns screams NERD. The BLUE element of my project is the navy in her sweater, the background paper, and in the title. The NEW element of my project is the pictures. I finally got some printed! Whoo Hooo a layout with current pictures on it. That is definitely something new for me. Here is a close up of my little nerd doing her best nerd pose.

photo (4)

Now head on over and see what Felicia has for you at http://www.scrapperinthemaking.blogspot.com

I hope you enjoy our Something Old, Something New, Something Borrowed, and Something Blue blog hop.

Wednesday, January 4, 2012

Something New- Cooking With Cricut

Today's Cooking With Cricut challenge is to use something new. I used my newest cartridge on my baby project for yesterday, so I looked for my next newest cartridge and found Kate's Kitchen. This cartridge is full of some adorable cooking themed images and the paper patterns are great! I flipped through the book and thought this little egg plate was cute and I knew I had the perfect sentiment stamp to go along with it.


I cut the egg plate and inked around the edges. Then I cut 2 5x7 rectangles and filled them with different patterns. I inked around the edges of the papers and added them to the card. I covered the seam with some turquoise lace. I cut a square with another pattern and cut a photo corner out of it and then printed a red rectangle to stamp my sentiment "egg-specially for you". I hope you have a chance to stop by and join in our challenge at www.cookingwithcricut.com