I recently purchased a cricut Imagine and I love it!!! You can make some great projects in a very little amount of time. When I was given the chance to join in this Imagine blog hop, I jumped at the chance. You should have ended up here from Tisha's blog. If you didn't don't worry, the hope goes in a circle so you will still see everyone's fabulouse creations.
I decided to make some Best Friends t-shirts for my daughter and her BFF. I used this adorable bread and butter image from the Better Together cartridge. I flipped the image and printed it on iron transfer paper. I then laid it on t shirt and ironed it on medium setting for about 3 or 4 minutes. Then I peeled the backing paper off and my t-shirt was complete. 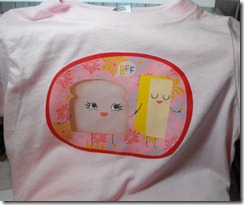 I wish I could say it worked perfectly on my first try, but it did take more than once to get it right. My advice is to make sure you have it positioned where you want it and do not put the iron directly on the image to do touch ups. That does not work. Now, if you want to give your BFF a t-shirt, you need a cute bag to put it in. I decorated the gift bag with the same image.
 This time I split the image up into layers and pop dotted the bread and butter from the background. I used the Plantin Schoolbook cartridge for the borders and filled them in with a pattern from Better Together so they would match the toast image. Here is a picture of the finished project.
  I have really had a lot of fun with this new machine and I can’t wait to create more with it. Now, hop on over to Sarah’s blog and see what she has to share with you.


![new years card [1600x1200]](https://blogger.googleusercontent.com/img/b/R29vZ2xl/AVvXsEjVB4WFB7Udte1kEiCdRG-OwwlCgifgsZpAM_2dY0rmc4iriPhcCFFou9qOOGnGCm0gm4T0WwWV3PBJ8UQAZpQCksnc9hH7C6OGyz8ZxdWinnFLvvRfa4y2LiWCGxtuFBhEDaKbRZxiLYo/s1600-h/new%20years%20card%20%5B1600x1200%5D%5B2%5D.jpg "new years card [1600x1200]")
![misc and xmas_0003 [1600x1200]](https://blogger.googleusercontent.com/img/b/R29vZ2xl/AVvXsEhHt2CokiP9NNcZGZOMk4LXs8gRJC8O3n0xCOD1rlrCaSH8kB7Y3uo-L50FavpjqUHsXvBVIbKL2t62jhcdF7j3qTk5FAlVpuv0Kxxk7Q6I11K_yt2oKwgTBdlM_oamBHtxJZm130I61r0/s1600-h/misc%20and%20xmas_0003%20%5B1600x1200%5D%5B2%5D.jpg "misc and xmas_0003 [1600x1200]")
![misc and xmas_0004 [1600x1200]](https://blogger.googleusercontent.com/img/b/R29vZ2xl/AVvXsEiCGJGGlUltkuxg_AFk1tMkvs_QUhv3q2HohYbdq2SQBm_-MvOijFh8tkmhR0XBEMzSeH89HUn82vSya9nAppq8wrx_4yD4GKr5SIjhfH1OX2crYrVCap7zCwNYdJcQ_sAQkOrii-o4wco/s1600-h/misc%20and%20xmas_0004%20%5B1600x1200%5D%5B2%5D.jpg "misc and xmas_0004 [1600x1200]")
![new years card [1600x1200]](https://blogger.googleusercontent.com/img/b/R29vZ2xl/AVvXsEhq4d95l6TnogPuTK6wfupY_jjD41wW4G6X1I0L-YRmXmvjyjY8k5G2oorU_peJnXxaRFuSWGsOgR-2nmIofVfxnhO1YdLr4mqpNLc-YEfk3hBYJbCQfI9IdPbnbQPrqvhBhhXxH-S99YE/s1600-h/new%20years%20card%20%5B1600x1200%5D%5B5%5D.jpg "new years card [1600x1200]")





 Posts
Posts